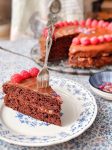
Blissful Chocolate Almond Cake - vegan & gluten-free
This is the perfect cake for all the chocolate lovers out there. It's double chocolatey inside and out, and the silky icing makes you wonder, how this can be an almost healthy dessert.
It's vegan, gluten-free and naturally sweetened. Happy indulging! 😘
[:de]Zutaten[:en]Ingredients[:]
For the cake:
Dry ingredients:
- 250 g gluten-free flour mix*
- 250 g ground almonds
- 40 g cacao powder (unsweetened)
- 1/2 Tbsp baking powder
- 1/2 Tbsp baking soda
- 1/2 tsp each of ground vanilla, cinnamon & cardamom
- pinch of salt
Wet ingredients:
- Liquid of 1 400 g can of chickpeas (Aqua Faba)**
- 1 cup + 4 Tbsp | 250 ml maple syrup
- 1 cup + 4 Tbsp | 250 ml plant-milk (I used soy)
For the icing:
- 4 heaped Tbsp plant-based yoghurt (I used soy-coconut)
- 4 Tbsp coconut blossom syrup***
- 3 Tbsp melted virgin coconut oil
- 2 Tbsp unsweetened cacao powder
Additional for the middle layer & decoration:
- 3 heaped Tbsp strawberry jam (naturally sweetened with agave)****
- 2 handfulls of fresh raspberries
- sprinkle of dried edible flowers
[:de]Anleitung[:en]Instructions[:]
Baking:
-
Preheat your oven to 180°C | 360°F fan setting.
Grease 2 round baking pans (Ø 26 cm) with a little coconut oil and set aside.
-
Put all dry ingredients in a big bowl and mix using a whisk to make sure no lumps are left.
-
Add the wet ingredients to the bowl and whisk until everything is well combined. Be careful not to overmix.
-
Divide the batter equally between your prepared baking pans and bake for 25 minutes. (A toothpick should come out or with only a few crumbs on.)
-
Once baked, let your cakes cool completely before decorating it.
Decorating:
-
While your cakes are cooling, you can make the icing.
Simply put all ingredients (apart from the yoghurt!) in a little pan and put it on low heat and stir, so that all ingredients come together. Take it off the heat, wait 5 minutes, then add the yoghurt and mix until you got a shining chocolate sauce.
-
Once your cakes have cooled, spoon the strawberry jam onto the bottom layer and spread it evenly. Then add half of your chocolate icing on top and also spread it. As the icing is still rather fluid, be careful that not too much of it runs down at the sides.
-
Carefully put the second cake layer on top and press it down a little bit.
Now you can pour the rest of the chocolate icing over your cake, spread it evenly and decorate with the raspberries and the dried flowers.
-
Put the cake into the fridge for about an hour, so the icing can set and you can cut neatly pieces.
Cut your finished cake into 12 pieces and enjoy!
[:de]Anmerkungen[:en]Notes[:]
*I used a pre-made mix of corn starch, brown rice flour, whole millet flour and guar gum.
**You can use your chickpeas for making some hummus or maybe give my Easy Chickpea Patties a try.
***You can also use date syrup.
**** Or strawberry-rhubarb jam, if you can find it.
I always choose organic produce whenever possible. It's not only much better for my health (and yours, too), but also for our environment. 🌍💫💚